
Usually, Patients pay their Copay when checking in at reception before any actual charges have been incurred or documented in an Encounter. The Enter Copay process allows you to collect their money and earmark it for a portion of anticipated charges. Perform the following steps to Enter Copay.
- Select Enter Copay from one of the two following places:
- The Patient record: Click Enter Copay on the toolbar at the top of the Patient screen.
—or—
- The main MBSWin Billing screen: Click Enter Copay on the Transactions menu on the left side of the screen.
The Add Copay screen will appear, as shown below.
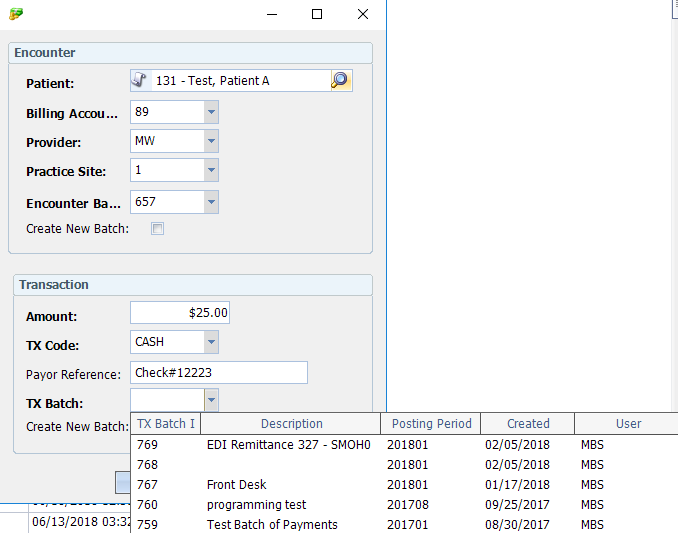
- Fill in the Encounter section.
- Patient: If you opened this screen via the Patient record, the Patient’s name will default. If you got here via the main screen, enter the Patient Id (or use the search icon) and press the Tab key.
- Billing Account: Defaults from the Patient record. If the patient has multiple Billing Accounts, this field will appear in yellow, and you must select the appropriate one from the drop-down.
- Provider: Select from the drop-down.
- Practice Site: Select from the drop-down.
- Encounter Batch: Select the batch to which the payment should be applied from the drop-down. If no batch has yet been created, check the Create New Batch box.
- Fill in the Transaction section.
- Amount: Enter the payment amount.
- TX Code: Select from the drop-down whether payment is by cash, credit card, check, etc.
- Payer Reference: Enter reference information, such as check number, type of credit card, etc.
- TX Batch: Select the batch into which the payment is being entered from the drop-down. If no batch has yet been created, check the Create New Batch box.
- Click OK.
If you checked Create New Batch either for the Encounter or the Transaction, the New Batch screen(s) will appear for you to create the necessary batch(es). Once done, the Add Copay dialog box will appear, as shown below, asking if you want to print a receipt.
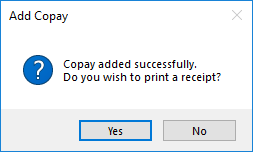
- Click Yes or No as is appropriate.
The Patient now has a credit on their account, which will later be applied when the Encounter is entered.
Apply Copay to Encounter
In the previous procedure, we collected a Copay, which applied a credit to the Patient’s account. Once you have entered the charges on the Patient Encounter, and clicked Save, the system will recognize that a credit exists and give you the opportunity to apply it. Perform the following steps to apply the Copay:
- Enter the Encounter and add services, then hit save.
The Select a Copay and Encounter Services screen will appear, as shown below.
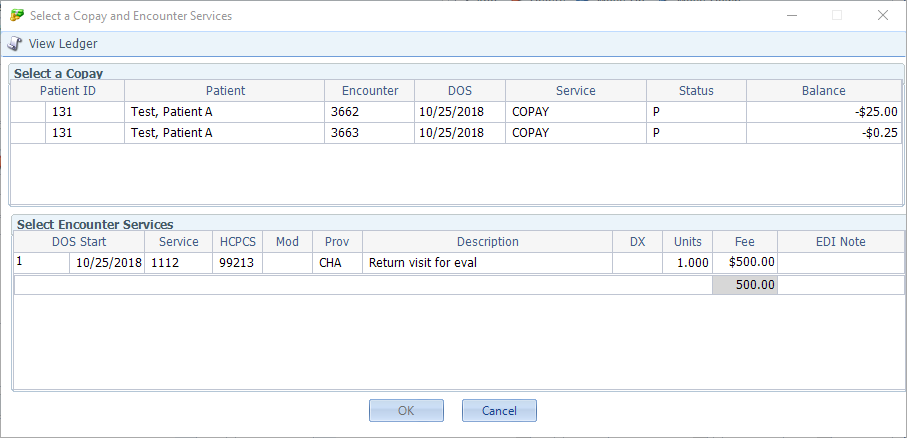
- Click to select the appropriate row from the Select a Copay section at the top.
- Click to select the appropriate row from the Select Encounter Services section at the bottom (usually applies to the office visit, but can be adjusted to a different service line later if the EOB states otherwise).
- Click OK.
The Create Transactions screen will appear, as shown below.
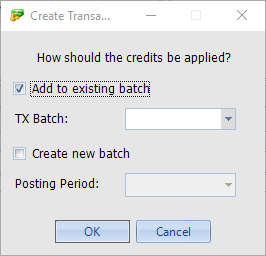
- Fill in the appropriate fields.
- TX Batch: Either select an existing batch from the drop-down, or check the Create New Batch box if a batch has not yet been created.
- Posting Period: Select from the drop-down.
- Click OK.
The Apply Credits confirmation dialog box will appear to let you know which batch the credit was applied to, as shown below.

- Click OK.
Now, if you were to look at the Patient Ledger (not required), you would see that the Balance on the selected service is reduced by the amount of the Copay, as shown below.

Connect
1220 E 7800 S, Floor 3
Sandy, UT 84094
Toll-Free (888) 337-4441
