
Unless your Encounters feed directly from an EHR database, the biller will enter them manually, most likely referencing a paper encounter form on which the provider has marked the relevant diagnoses and services. Perform the following steps to add an Encounter to an existing Batch.
- From the Transactions menu on the left side of the screen, select Encounters.
A list of Encounter Batches will appear, as shown below.
- Double-click on the desired Batch to open it.
The Encounter Batch screen will appear with a list of Encounters at the bottom. In the example shown below, there has been one Encounter entered on this Batch.
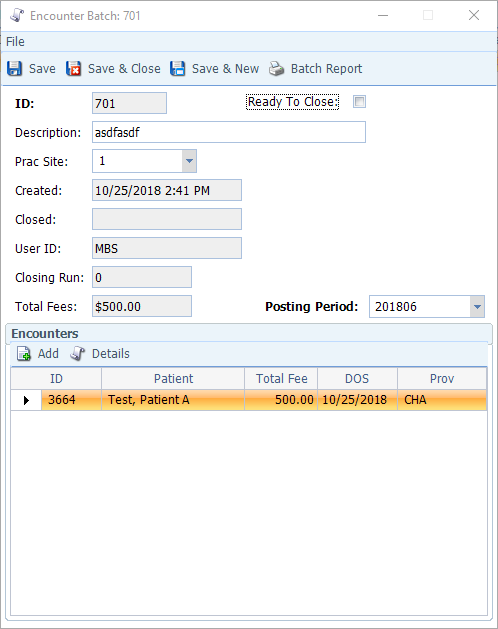
- Click Add to add an Encounter to the batch.
A blank Encounter Form will appear, as shown below. Note that the Site field (top center) is pre-populated because the Batch specifies a Site. If it had been left blank in the Batch, you’d be required to fill in this field manually (applicable if the Batch will contain Encounters from multiple sites).

- Enter the Appt ID (should appear on the charge slip) and hit the tab key (Surgeries and Hospital Encounters typically will not have Appt IDs, in which case leave the Appt ID blank and enter the Patient ID instead).
Entering the Appt ID will populate the following fields: Patient, Bill Acct, and Insurance Coverage. Entering just the Patient ID will populate the Bill Acct and Insurance Coverage fields.

- Review Bill Acct: If this field is yellow, it means that the Patient has multiple Billing Accounts. Use the drop- down to select the appropriate one, as shown below.

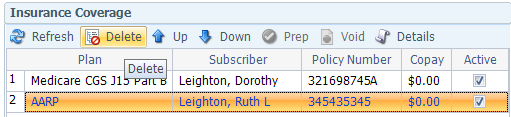
- Review Insurance Coverage: All of the Patient’s active insurance policies will be
- Order: The order in which the policies are listed indicates primacy, as indicated in the Patient record (1=primary, 2=secondary, etc.). Use the Move Up/Move Down arrows to ensure they are in the proper order.
- Delete: If one of the policies on the list is not relevant to this Encounter (i.e. one is specifically for an accident or worker’s comp claim), click to select it and then click Delete to remove it from the Encounter, as shown below.
- Force to Paper: When this box is checked, the claim will be sent to the paper claim queue rather than being to the EDI queue.
- DME Claim: Check this box for a claim related to durable medical equipment (e.g. crutches, walker, etc. )
- Fill in the Diagnoses section. For each Diagnosis, click the Add button on the Diagnoses toolbar or hit CTRL+A.
A new row will appear with a search icon in the Diagnosis ID field, as shown below.
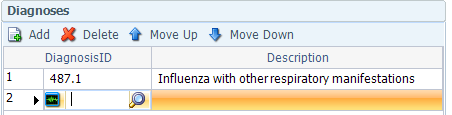
If you know the Diagnosis ID, you may type it into the field. Otherwise click the search icon and make the appropriate selection from the Diagnoses table.
Press the tab key to accept your entry (the Description field will auto-populate based on your Diagnosis ID)
Repeat these steps until you have added all the desired Diagnoses. You can add up to twelve Diagnoses on an Encounter. However, each Diagnosis must be associated with at least one service.
Use the Move Up/Move down buttons to adjust the order in which the Diagnoses are listed.
- Fill in the Services section.
Click the Add button (or CTRL+A) to enter a service.
A new row will appear, as shown below. Use the Tab key to advance through the fields.

DOS: Will default to Appointment date if you indicated an Appointment ID. If not, select the date from the drop-down
Service: If you know the Service ID, you may type it into the field. Otherwise, click the search icon and make the appropriate selection from the Services table.
Prov: The Provider will default from the Appointment if you indicated an Appointment Id. If not, enter the rendering Provider ID.
Description: Pulls in automatically from the Service ID.
DX: Enter the corresponding line number(s) from the Diagnoses section to indicate which ones are relevant to this Service. You are allowed up to four Diagnoses per Service. You may use hyphens or commas to separate entries. For example, 1-3,5 or 1,4-6 or 1,3,5,7. The system will automatically format it using commas after you Tab out of the field.
Units: Enter the quantity. Usually it is one unless the item refers to a drug or other physical goods. The unit multiplies the fee automatically.
EDI Note: Enter brief note that will appear on the EDI line item, if applicable (if sending to a paper claim, this information will appear in Box 19 of the form).
Repeat these steps until you have added all of the services rendered during this encounter. Use the Move Up/Move down buttons to adjust the order in which the Services are listed.
Note: The following fields, which appear at the bottom of the Services section, apply to whichever Service row is highlighted above. Take care to ensure that the correct row is highlighted when filling out this section.
DOS End: Use if the Service extended over multiple consecutive days. The fee will be charged for each day from DOS Start to DOS End.
POS: Select the Place of Service from the drop-down (defaults to POS specified for this Service in the Service table, if any)
Supervising: If the Provider of the Service is an NP or PA and requires a Supervising physician to be specified, select the appropriate individual from the drop-down.
Ordering: Select the name of the ordering physician from the drop-down (if applicable).
NDC (National Drug Code): If entered for the Service in the Service table, will pull in automatically here. If not, enter it by hand.
Note: The NDC must be 11 digits, although some drug containers have a 10-digit number printed on them. The following is the accepted conversion process:
Digit format = 4-4-2: Add a 0 before the 1st digit
Digit format = 5-3-2: Add a 0 between the 5th and 6th digits Digit format = 5-4-1: Add a 0 before the last digit
Units Code: For drugs, select the appropriate unit from the drop-down (can be decimals to the fourth digit).
MEA R/MEA Q/MEA Value: These measures are used primarily by urology, hematology, and nephrology for such tests when generating the 837 claim file. They are not used unless these tests are performed/required for payment of service.
MEA R: Select the appropriate test measure reference from the drop-down.
MEA Q: Select the test measure qualifier from the drop-down.
MEA Value: Enter the test measure value.
Pay Provider: Defaults from the Patient record.
Accept: Defaults from the Insurance Plans table.
Bill Ins: Default to selected if there is active Insurance Coverage on the Encounter. Can de-select it if necessary (i.e. if you know insurance doesn’t cover the service)
Status: Defaults to I (Pending Insurance) if there is active Insurance Coverage or P (Release to Patient) if there isn’t. The other two status options, X (Under Review) and C (Collection) are not relevant at the time of the Encounter, but may be after billing, depending on the outcome.
- Fill in Referring & Primary Care Providers section, if applicable.
Ref: Click the Copy Ref Provider button on the toolbar at the top of the screen to copy in the Referring Provider information from the Patient record. Otherwise, use the search icon to locate and select the appropriate provider from the Referring Provider table.
PCP: Use the search icon to locate and select the appropriate provider from the Referring Provider table.
NOC (Nature of Condition): Select the appropriate choice from the drop-down.
Last Seen: Use the drop-down to select the date the Patient was last seen by their PCP.
XRay: Select date of last XRay (chiropractors and podiatrists)
Init TX: Select date of initial treatment (chiropractors and podiatrists)
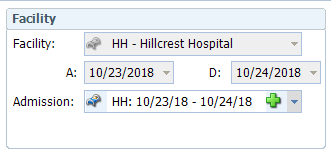
- Fill in Facility section if the services were performed somewhere other than the Office (e.g. hospital, nursing home, etc.)
Admission: if this field is yellow, there is an Admission stored in the Patient record. If that is the case, use the drop-down to select the appropriate Admission record. This will cause the Facility, A (Admission date), and D (Discharge date) fields to populate, as shown below. You can also use the green plus sign to create an Admission record on the fly.
- Fill in OB section, if applicable, for a pregnant patient.
LMP: Enter date of last menstrual period.
EDC: Enter estimated due date.
- Fill in Paper Work section if sending separate supporting paperwork.
Type: Select the type of paperwork from the drop-down.
Method: Select the transmittal method (e.g. fax, email, etc.) from the drop-down.
ID: Enter an identifier, such as fax number or policy number
- The EPSDT (Early Pediatric Screening Diagnosis Testing) is typically for Medicaid patients.
EPSDT: Select the appropriate code from the drop-down.
Prior Auth: Enter pre-certification number (box 23 on the form)
Once finished with the Encounter tab, proceed to the Accident/Injury tab only for claims related to an accident related or work related injury.
- Fill in the Accident section.
Type: Select the type of accident from the drop-down.
State: Select the state in which the accident occurred. Date/Time: Select the date and time when the accident occurred. Emergency: Check if the patient was seen in the emergency room
- Fill in the Work Related section, if applicable.
Work Related: Check the box if the accident was work related.
Date of Injury: Select the date on which the injury occurred.
Date of Onset: Select the date of the onset of symptoms.
Same/Similar: Select the date when the Patient last experienced the same or similar illness, if applicable.
Acute Manifestation: Select the date when acute manifestation occurred.
Disability Start/Disability End: Select the date on which the Patient’s disability benefits started/ended. Last Worked: Select the last date the Patient worked before the injury.
Return to Work: Select the date on which the Patient is cleared to return to work.
- Save the Encounter. Once saved, the Encounter will appear as a row at the bottom of the Encounter Batch screen.
Save & New: Saves the current Encounter and opens a new, blank Encounter form.
Save & Close: Saves the current Encounter and returns you to the Encounter Batch screen.
- Repeat the above process until all Encounters have been added to the Batch.
Connect
1220 E 7800 S, Floor 3
Sandy, UT 84094
Toll-Free (888) 337-4441
