
Creating Templates
- ChartLogic Installation
- Require a CPT and ICD10 to Save & Finish
- Enable Secure Password
- ECR Reporting
- Launching ChartLogic
- Changing Passwords
- Automatically Send Referral Reply Letter on Save and Finish
- Diagnosis Director
- Superbill Configuration
- Patient Education
- Flowsheets
- Creating Templates
- Address Book
- E/M Compliance
- Patient Intervention
- Patient Tracker
- Options and User Security
- F12
Creating Templates
Templates speed up and standardize information entry and can be created for exams, messages, referral reply letters, and more.
 To create a new template:
- Go to Configure > Templates.
- Select the category from the left you would like to create the template for.
- Click on the New button on the top of the screen. Type in the name of the new template and click OK.
- Use the icons across the top of the screen to adjust formatting, insert objects, etc.
To copy a template:
- Go to Configure > Templates.
- Select the template you wish to copy. Then click the Copy button.
- Type in the name for the copied template and click OK.
To rename a template:
- Go to Configure > Templates.
- Select the template you wish to rename. Then click the Rename button.
- Enter the new name and click OK.
To delete a template:
- Go to Configure > Templates.
- Select the template you wish to delete.
- Click the Delete A pop-up will appear asking if you are sure you want to delete. Click Yes.
Format Toolbar:
![]()
- Zoom: Zoom can be adjusted anywhere from 10 to 400 percent.
- Page Export: Allows you to save a copy of the template.
- Print Preview: Allows you to preview what the page would look like if printed.
- Page Setup: Allows quick set up of Headers, and Margins.
- Print: Prints the template.
- Send Fax: Faxes the template to a number of your choosing.
- Undo: Reverses actions in the exam.
- Redo: Redoes actions in exam.
- Cut: Cuts selections from the exam. (Ctrl + X)
- Copy: Copies selections in the exam. (Ctrl + C)
- Paste: Pastes selections into exam. (Ctrl + V)
- Delete: Deletes selections from the exam.
- Find: Finds selections in the exam. (Ctrl + F)
- Replace: Replaces found selections in the exam. (Ctrl + H)
- Select All: Selects the entire exam. (Ctrl + A)
- Hyperlink: Allows you to insert a hyperlink.
- Smart Mark: Changes view of SmartMarks (invisible, minimal, and maximum).
- Normal Layout: Exam page displays from the left side of the screen.
- Centered Page Layout: Exam page displays in the middle of the screen.
- Control Character: Shows characters for actions such as paragraph and tab.
- E/M Toogle Color: Adds/removes color to E/M information.
- SmartFields: Opens screen for selecting SmartFields, SmartMarks, and flowsheets.
- Timer: Displays timer.
- SmartMark Wizard:
- Insert Text: Opens folder for inserting text file into exam.
- Bitmap at Cursor Position (Illustrator): Opens ChartLogic Illustrator for inserting illustration into exam.
- Wave at Cursor Position: Opens ChartLogic Recorder for inserting voice file into exam.
- Page Break: Inserts a break in the exam to create a new sheet.
- Format Character: Allows selection of font characteristics.
- Bold: Bold’s selected lettering.
- Italic: Italicizes selected lettering.
- Underline: Underlines selected lettering.
- Align Left: Left justifies template.
- Center: Center justifies template.
- Align Right: Right justifies template.
- Format Paragraph: Allows setup of line spacing and paragraph alignment.
- Format Bullets and Numbering Attributes:
- Attributes: Allows user to select any of the below listed bullets or numbering in one screen.
- Increase Level: Tabs bullet to the right.
- Decrease Level: Tabs bullet to the left.
- 1,2,3: Inserts this outline format.
- A,B,C: Inserts this outline format.
- b.c.: Inserts this outline format.
- I,II,III,IV: Inserts this outline format.
- i,ii,iii,iv: Inserts this outline format.
- Bullets: Inserts bullets.
- Tabs: Allows setup of tab stops and alignment.
- Format Style: Allows setup of styles.
- Background Color: Allows user highlight text.
- Spell Check: Runs Spell Checker tool.
- Insert Table: Opens window to select the number of rows and columns to add to a table and insert into an exam.
- Insert Table Column to the Left: Inserts column into the table left of the cursor position.
- Insert Table Column to the Right: Inserts column into the table right of the cursor position.
- Insert Table Row Above: Inserts a row into the table above the cursor position.
- Insert Table Row Below: Inserts a row into the table below the cursor position.
- Delete Table: Deletes the table where the cursor is positioned.
- Delete Table Column: Deletes the column of the table where the cursor is positioned.
- Delete Column Row: Deletes the row of the table where the cursor is positioned.
- Grid Lines: Shows the grid lines of the table where the cursor is positioned.
- Properties: Allows user to set the properties of the table where the cursor is positioned.
Note: Format icons viewed in the exam screen are selected in Configure > Options > User Accounts > Providers/Users > [Users Name] > Format Bar.
Note: Tables are particular in the way they are set up in the ChartLogic EMR. To avoid any issues, separate each table added to the template with a return spacing as shown in the above sample.
SmartFields & SmartMarks
SmartFields are a special field which will pull data into a template from another place in the EMR. A SmartMark is a hidden text item in the EMR which can be used during dictation to skip around the note.
How to add a SmartField to a template:
- Click the SmartFields icon. The icon is shown with a red ~ inside of a white box.
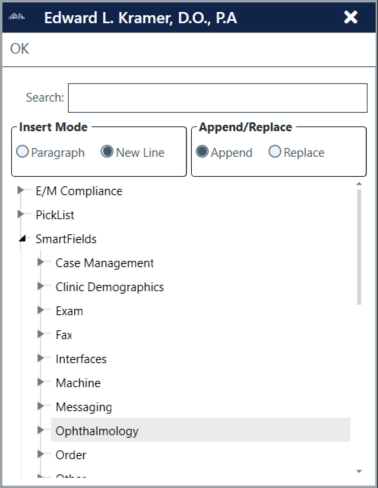
- Select Insert Mode. Paragraph will insert SmartField direct after cursor. New Line will place SmartField on a new line below the cursor.
Note: Append/Replace: If Text or another SmartField is selected in the template, Append will place any SmartFields after the selected item, and Replace will replace any selected items. Not necessary to change if adding new fields.
- Expand SmartFields
- Expand subsection where information is to be pulled from.
Note: Other subsection will include 2 check mark items, one for an unchecked field, and the other for a checked field. One for Click Date, which when the SmartField is clicked, will show the current date of when item was clicked. and a SmartField for Page Number.
- Place Cursor in template where you would like new SmartField to go.
- Double Click the SmartField you wish to add. SmartField should be added to the template.
Note: SmartFields names are not editable. When you open the template outside of the Templates page, you can determine what information is a SmartField, from the mouse cursor. It will show as the standard pointer when not over a SmartField, and show as a pointing hand when over a SmartField.
- Click OK when done adding SmartFields.
How to add a SmartMark:
- Follow Steps 1-2 above.
- Expand SmartMarks.
- Place Cursor in exam where you wish the SmartMark to be placed.
- Double click the SmartMark you wish to add. SmartMark should be added to the template.
- Click OK when done adding SmartMarks.
Note: SmartMarks work in a similar fashion to what Dragon Naturally Speaking “Go To” marks work. ( [] ) When Dictating you can say things like “Go To (Name of SmartMark)” and it should place the cursor in the place where the SmartMark is.
Connect
1220 E 7800 S, Floor 3
Sandy, UT 84094
Toll-Free (888) 337-4441
