
The Next Available feature is the most efficient way to schedule an appointment while ensuring that you are following your practice’s scheduling policies. It allows you to enter the desired conditions for the appointment and then provides a list of available date/time slots that fit the criteria.
Perform the following steps to schedule an appointment using Next Available (you can do this either from the Patient record or from the main Scheduling screen):
- Click the Next Available button.
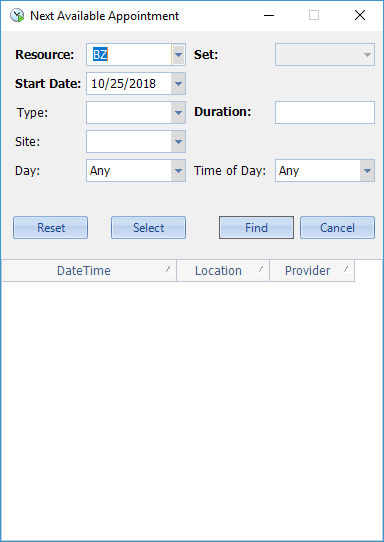
The Next Available Appointment screen will appear, as shown below.
- Fill in the desired criteria.
- Resource: Select the desired resource from the drop-down or Resource Set. The Resource Set will allow the User to select the next available appointment for any one of the Resources within the given set.
- Start Date: Select the date from which you wish to start searching (defaults to current date). Remember, D, W, M, Y is also available for searching along with a number (15D, 3W, 6M, 1Y).
- Type: Select the desired Appointment Type from the drop-down (this will automatically populate the Duration field). Or select Duration to indicate the desired duration for an appointment. The User will then be able to fill in an Appointment Type once the duration is selected.
- Site: Select the desired appointment site from the drop-down if the patient states a preference.
- Day: Select a preferred day of the week if the patient states a preference.
- Time of Day: Select AM or PM if the patient states a preference.
- Click Find.
A list of date/time/site options will appear at the bottom of the screen, as shown below. Ten options will appear at a time. If none of those work for the patient, click More to get ten additional options. Repeat this until you arrive at an option that the patient accepts.
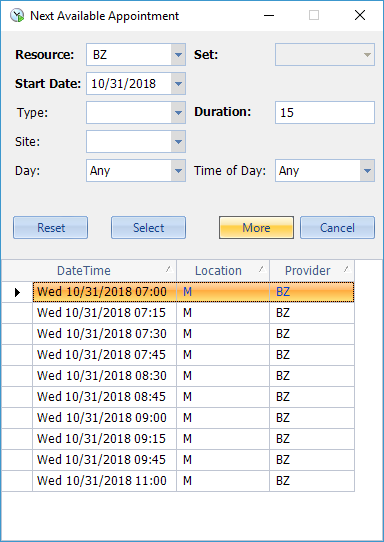
- Select the desired appointment date/time/site by either highlighting the row and clicking Select, or double- clicking on the row.
The Appointment screen will appear, as shown below.
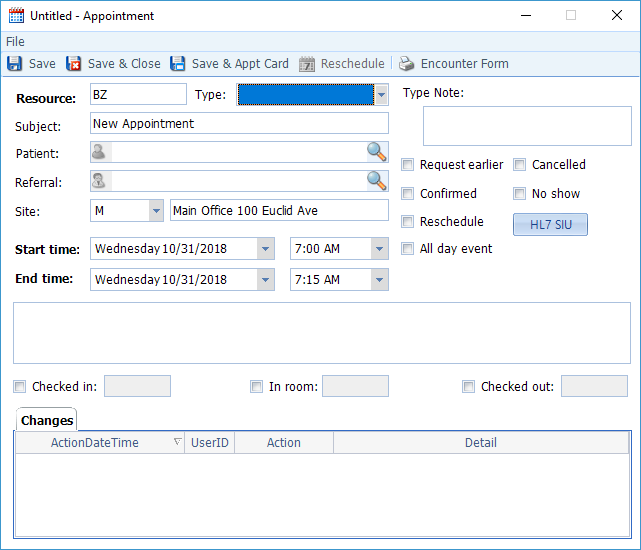
- Fill in the necessary information as follows:
- Resource: Defaults from Next Available form.
- Type: Defaults from Next Available form.
- Type Note: Cannot type anything into this field; it pulls from the Appointment Type (i.e. “no food or drink 12 hrs prior”)
- Subject: Defaults to “New Appointment,” but you can type in a more informative description, such as “sore throat,” “flu,” etc. If no Appointment Type has been selected, the User will fill in the Subject area describing the appointment (ex: Dr is meeting with Accountant).
- Patient: If you initiated the Next Available search from the Patient record, the Patient will auto-populate. If you initiated the search from the main Scheduling screen, click the magnifying glass to search the database and select the desired Patient. No patient is required if this is not a patient appointment.
- Referral: Will pull in automatically from the Patient record if it contains one. Otherwise, if applicable, click the magnifying glass to search the database and select the desired Referring Physician. Not required.
- Site: Defaults to the Site indicated when you selected the appointment from the Next Available form. Not required.
- Start time/End time: Default from the appointment you selected.
- Text box: Anything entered in the large text box will appear as a note on the Resource report.
- Save the appointment, either by clicking Save & Close or Save & Appt Card (if you wish to print an appointment reminder for the patient to take with them).
Connect
1220 E 7800 S, Floor 3
Sandy, UT 84094
Toll-Free (888) 337-4441
