
When changing an existing Appointment, it is important to check the Scheduling calendar first to ensure the new date/site/appointment type is compatible with the scheduling block to which you’re moving it. Upon saving, the system will give a warning if you are violating any of the rules, but will allow you to decide whether to go through with the change anyway.
There are two ways to reschedule an Appointment:
- Drag the Appointment to a new spot on the Scheduling Calendar (only works if moving the appointment to the same Resource).
—or—
- Open the Appointment and edit it.
Drag Appointment
- Locate the existing Appointment on the Scheduling calendar.
- Click and drag the Appointment to the desired time slot for the same Resource.

The following dialog box will appear to confirm your choice.

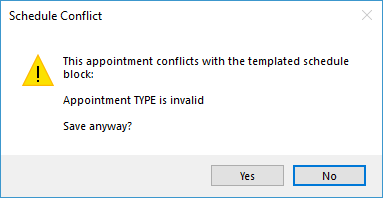
If you drag the Appointment to an inappropriate Scheduling Block, the following warning will appear. You may choose to ignore the warning and save it anyway.
- Click Yes on the dialog box (either confirmation or warning) to save the Change.
Note: Dragging the Appointment to a Schedule Block at another Site will pop up a warning to let you know it’s a different Site, but will not automatically change the Site on the Appointment itself if you choose to go ahead and move it.
Edit Appointment
- Double-click on the Appointment (either on the Scheduling calendar or from the Patient record within MBSWin Scheduling (can’t edit Appointments from MBSWin Billing side).
The Appointment form will open, as shown below.

- Make the necessary changes, such as the following:
- Date/time (be sure to look at the Scheduling calendar first to ensure that you’re moving the Appointment to an appropriate Schedule Block in accordance with your practice’s scheduling policy)
- Site (check the Schedule Block to make sure that the selected Resource is actually going to be at that site)
- Check the Reschedule box to indicate for reporting purposes that this was a rescheduled appointment. This Appointment may be changed to a different Resource and/or a different Site.
- Save & Close.
If you drag the Appointment to an inappropriate Scheduling Block, a warning will appear, such as the one below. Click Yes to ignore the warning and save it anyway or No to cancel the change.
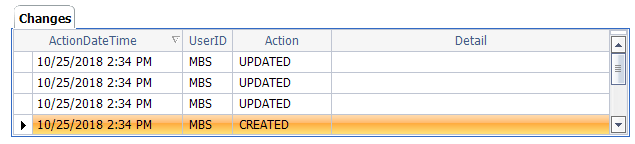
All changes made to the Appointment will be documented at the bottom of the Appointment form, as shown below.
Connect
1220 E 7800 S, Floor 3
Sandy, UT 84094
Toll-Free (888) 337-4441
