
When an individual who is new to your practice calls to make an appointment (or shows up as a walk-in), the first step will be to create a new Patient in MBSWin. The following is a summary of the steps for registering a Patient:
- Search the database to avoid duplicates
- Open a New Patient form.
- Enter Demographics data.
- Create a Billing Account.
- Enter Patient’s Insurance Coverage (if any) and check eligibility.
- Enter Patient Notes (if applicable).
- Enter Extended Demographics data (required only if MBSWin is interfaced with an EMR system).
Procedure
A. Search the database to avoid duplicates
When registering a patient, always search the Patient database first to prevent creating a duplicate. Even if the individual is a new patient, they may already be in the system as a Person (i.e. individual with no Patient ID, usually someone else’s guarantor, emergency contact, or insurance policy subscriber).
- Enter any one of the following – Patient ID, Last Name, First Name (partials are allowed—separated by comma) or DOB (date of birth), Chart ID (#xxxxxx) or phone number (xxx-xxx-xxxx) in the Find field (upper right corner of the screen) and press the Enter
Example: to find an individual named Peter Pan, whose Patient ID is 12 and DOB is 02/15/1965, any of the following are valid search terms:
- 12
- ,peter
- pa,pet
- pan
- 02/15/1965
We recommend always using the DOB to verify that you located the correct individual, as multiple people could share the same name (for this example, we’ll search by the last name Pan).
![]()
- Press Enter.
Search results will be displayed as shown below. Once displayed, you can continue to type additional information (more of the first name, birth date, any part of their address) to continue to narrow your search.
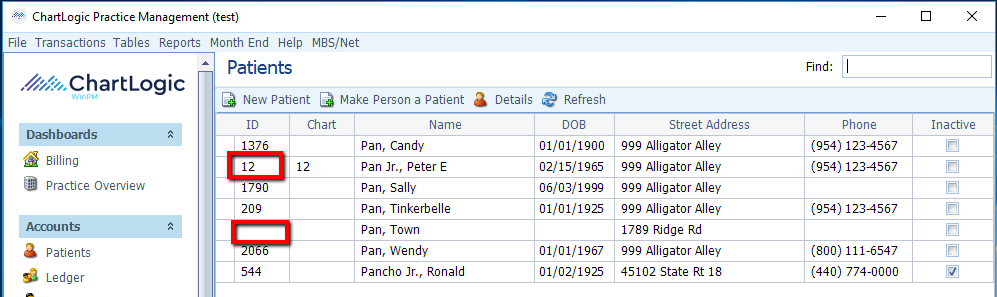
In the example above, we can see that Peter Pan is already in the system as a Patient, since he has an ID number. Wendy Pan is an example of someone in the system as a Person only (note lack of ID).
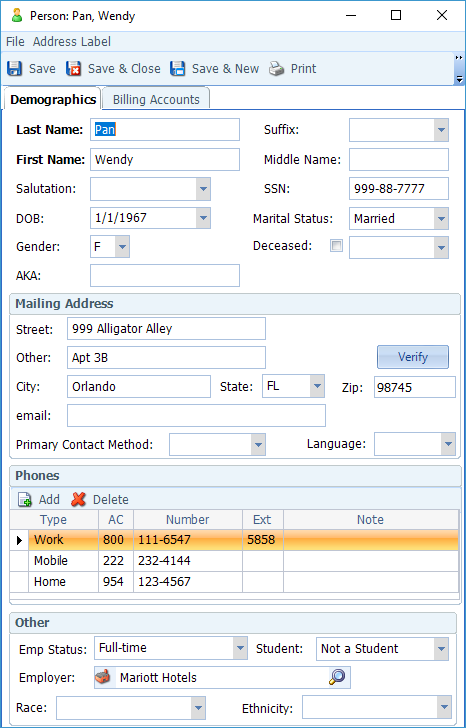
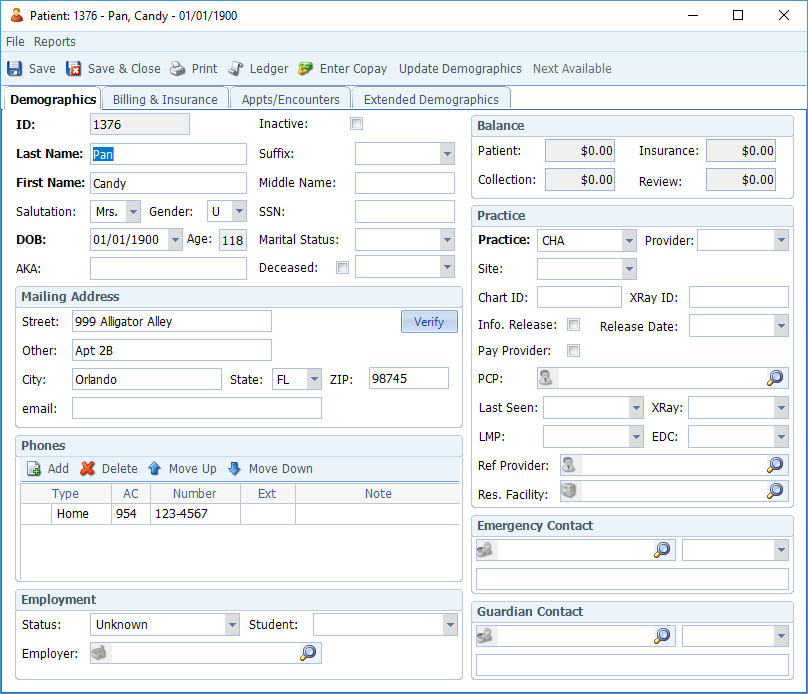
To see the difference between a Person and a Patient, you can double-click on each to view their form. The form on the left represents a Person, while the one on the right represents a Patient. Note that the form for the Patient has an ID number as well as additional fields, tabs, and toolbar buttons, while the Person only contains basic Demographic and Billing Account information.
B. Open a New Patient Form
The results of your search will determine how to proceed. If the individual is already in the system as a Patient (i.e. there is an individual in the system with the same name and DOB that already has a Patient ID), do not create a new Patient. Skip the Patient Registration process altogether and refer to the Edit Patient section of this manual for the steps to update the Patient record with the individual’s current information (e.g. change of address, new insurance, etc.).
Only perform the following Patient Registration steps if the individual is not in the database at all or is only in the database as a Person (no Patient ID).
- Open a New Patient form in one of the following ways:
- If the Name/DOB you’re looking for is not in the database at all, click New Patient.
- If the Name/DOB is already in the database as a Person, click on the desired row to highlight it and then click the Make Person a Patient button on the toolbar (see below).

A new Patient form will open (if Making a Person a Patient, it will pull in all data contained in the Person record). However, the Billing & Insurance and Appts/Encounters tabs will be grayed out (see below).

C. Enter Demographics
- Fill in the required fields (labeled in red).
These are the bare minimum fields you must populate in order to save the Patient record. The required fields will suffice for the purpose of scheduling an appointment. However, in order to perform billing functions, the rest of the relevant data must be entered. Some practices get this information over the phone at the time of booking, while others collect the necessary data later by having the patient fill out a paper form.
- Fill in the relevant additional Demographics fields on the left side of the Patient form.
The left side of the screen contains all of the basic Demographic information (name, address, phone, DOB, etc.). Fill in as much of this information as you have available.
- Fill in the relevant fields in the Practice, Emergency Contact, and Guardian Contacts sections on the right side of the Patient form.
Some of these fields are specific to certain specialties. An explanation of the fields is as follows:
- Info Release/Release Date: Box 12 of CMS-1500, Form 1500 claim. The Release Date field defaults to today’s date when the Info Release box is checked.
- Pay Provider: Box 13 of CMS-1500, Form 1500 claim.
- Last Seen/ XRay: These fields are for chiropractic specialists and denote the dates the patient was last seen and the date of the last XRay.
- LMP: Date of last menstrual period.
- EDC: Estimated Date of Confinement, i.e. due date (for Obstetric care)
- PCP/Ref Provider/Res. Facility/Emergency Contact/Guardian Contact/Employer: Any field with a magnifying glass on the right and an icon on the left is to be populated with data pulled from a separate practice defined Table.
![]()
Note: Clicking the magnifying glass pulls up a separate table in which you can use Find to search and select the appropriate entry to populate the field.
Note: Clicking the icon on the left brings up more information on the entry if the field is populated (icon will be in color when available).
- Click Save.
The record will be assigned an ID number and the rest of the tabs now become available for data entry.
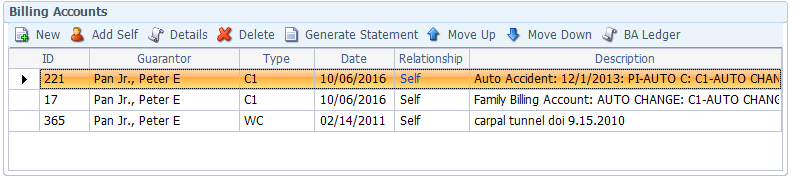
D. Create a Billing Account
The Billing Account identifies more information about the account (COPAY amount, Self Pay, Non-Billable etc) and the Guarantor (person responsible for this patient’s account). A patient could have more than one Billing Account. When posting Encounters (charges) you can select the correct Billing Account for the Date of Service.
If the patient is the Guarantor:
- Click ADD SELF.
The Billing Account window will open, and the patient’s name will automatically populate the guarantor field.
- Fill in the rest of the required fields using the drop-downs.
- Save & Close.
If the patient is NOT the Guarantor:
- Click New.
You will be brought to the Guarantor search window.
- Use the Find field to search for the Guarantor the same way you would for a Patient.
- Double click on the desired name to select (If you do not find the desired name, click New to create a Person, fill in the required fields, and click Save & Close.)
You will be brought to the Billing Account search window.
- Double-click on the desired Billing Account for the Guarantor to select (or, if no Billing Account exists for the Guarantor, proceed to step 5 to create one).
- Click New to create a billing account.
The Billing Account form will appear, auto populated with the name of the Person you just created.
- Fill in the remaining required fields, as shown below.
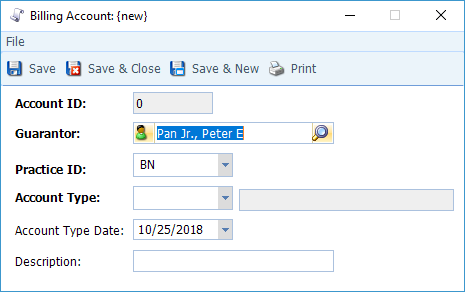
- Save & Close.
The selected or newly created Billing Account will now appear as a row in the Billing Accounts section of the Patient Billing & Insurance tab.
- In the Relationship field of the newly created Billing Account, select the relationship of the Patient to the Guarantor (Spouse, Child, Parent, etc.)
E. Enter Patient’s Insurance Coverage (if any) and check eligibility
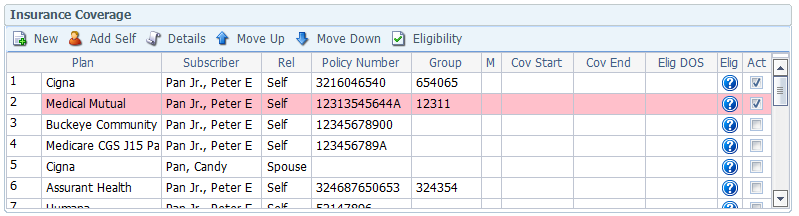
The Insurance Coverage section of the Billing & Insurance tab identifies the Patient’s insurance coverage. The Patient may have more than one active Insurance Plan, the first one on the list being the primary insurance (To change the order of the patient’s existing insurance coverage, select an Insurance Plan by clicking on it, then use the Move Up/Move Down buttons to determine its place on the list). Active Insurance Plans are indicated by a check mark in the Active box on the right of the row.
Use the following steps to add Insurance Coverage to a Patient.
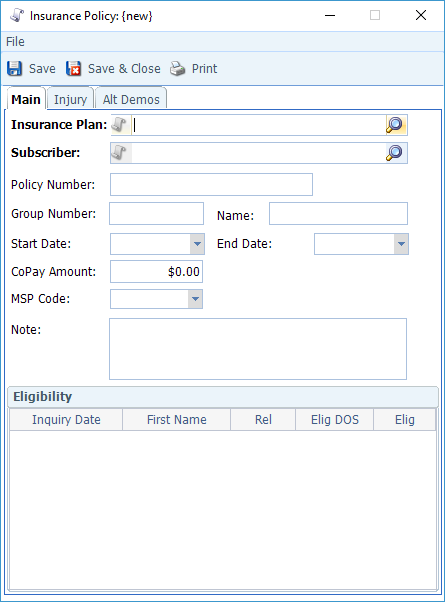
- If the patient is the Subscriber, click Add Self. If the Patient is not the subscriber, click New.
The Insurance Policy form will appear (the image below illustrates an Add Self—note the Subscriber field auto- populated with the Patient name).
- Click the magnifying glass on the Insurance Plan field to search the Insurance Plans table.
Be sure to select the Insurance Plan with the correct address, as there may be multiple entries for the same insurance company(see below), or click New to add a new Insurance Plan if you don’t find the one you’re looking for.

- Double-click on the desired Insurance Plan to select
You will be returned to the Insurance Policy form.
- If the Subscriber is someone other than the patient, click the magnifying glass on the Subscriber field to search for and select the Subscriber from the Person or Patient
If the subscriber is not in the table, click New, enter the required information, and Save. Note: You are adding a Person; the screen looks just like the left side of the Add Patient screen, except the only required fields are Last Name and First Name (although you may add as much information as you have available, e.g. DOB, etc., which will be required for claim submission).
Once you have selected or created the Subscriber, you will be returned to the Insurance Policy form.
- Save.
The Insurance Plan will be added as a row in the Insurance Coverage section of the Patient Billing and Insurance tab.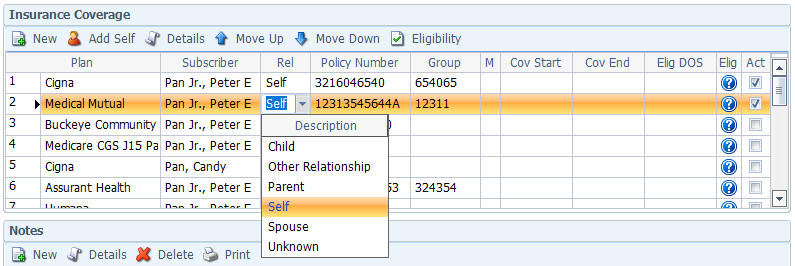
- Select the relationship of the Patient to the Subscriber (if not Self) from the drop-down (see above).
- To check eligibility, select the Insurance Coverage row and click the Eligibility button on the
The Eligibility Request form will come up, as shown below.
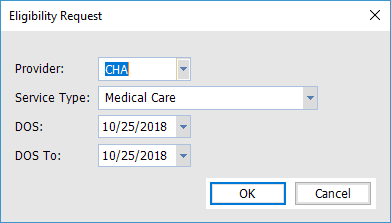
- Enter the Provider, Service Type, and DOS date range, and then click
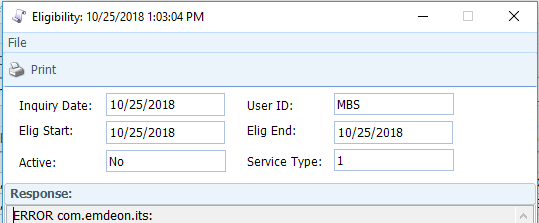
A report will pop up with the results, as shown below. Available information on the patient’s type of coverage will vary by payer.
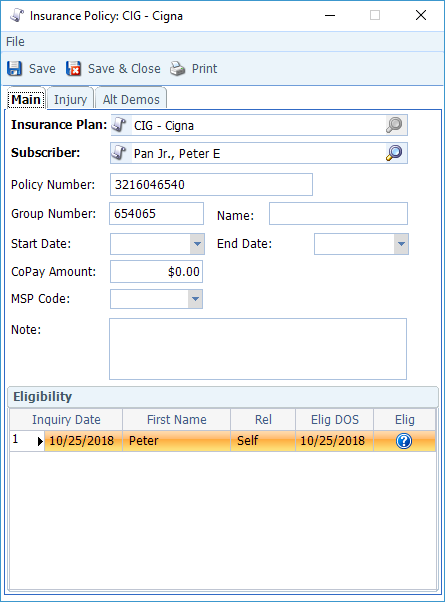
- The bottom of the Insurance Policy form shows the results of all past Eligibility checks (see below).
A green check denotes that eligibility was verified for the DOS listed. A question mark denotes that the eligibility was not verified. For more details on any past Eligibility check, double-click on the desired row and a report like the one above will appear.
F. Enter Patient Notes (if applicable)
Use notes to add useful information about the account. There are five types of special notes you can add to a Patient: Flash, Stop, and Statement, Encounter, and Tickle.
Use the following steps to create a new Patient Note:
- Click New.
A Note form will appear (see below).
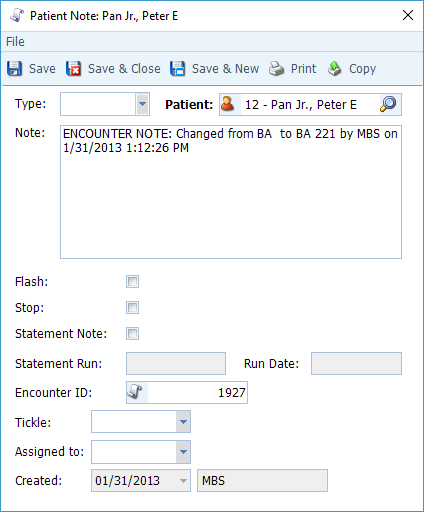
- Type: Select the appropriate Note Type from the drop-down (choices available from your Patient Note Types table).
- Note: Type in the text of the note.
- Flash: Check the Flash box if you want the note to pop up every time someone accesses the Patient’s It should be used only for things that need to be brought to people’s immediate attention. If a Flash Note becomes a nuisance, users may start to close the Flash Notes without reading them.
- Stop: Check the Stop box if you want to prevent access to the Patient’s account. The User will be prompted to enter the stop note password in order to view a patient’s account. The stop note check mark must be removed if the practice needs unimpeded access to this patient’s account.
- Statement: Check the Statement box to create a note that appears on the very next statement sent to the patient. A statement message is a “one time” message that will appear on the next statement generated for the patient.
- Encounter ID: This field is used if the Note is to be associated with a specific Encounter.
- Tickle/Assigned To: Select a Tickle (reminder) date and a User ID to assign the note for future follow up with the account. A Tickle reminder will be displayed on the assigned User’s Dashboard for easy access on the assigned reminder date.
- Save & Close.
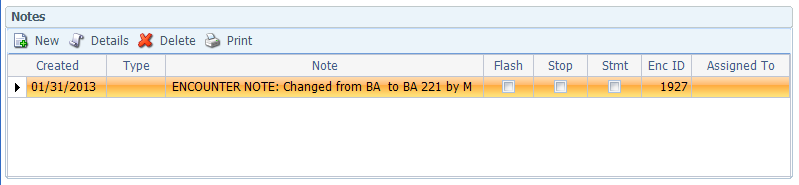
The Note will be added as a row in the Notes section of the Patient Billing and Insurance tab.
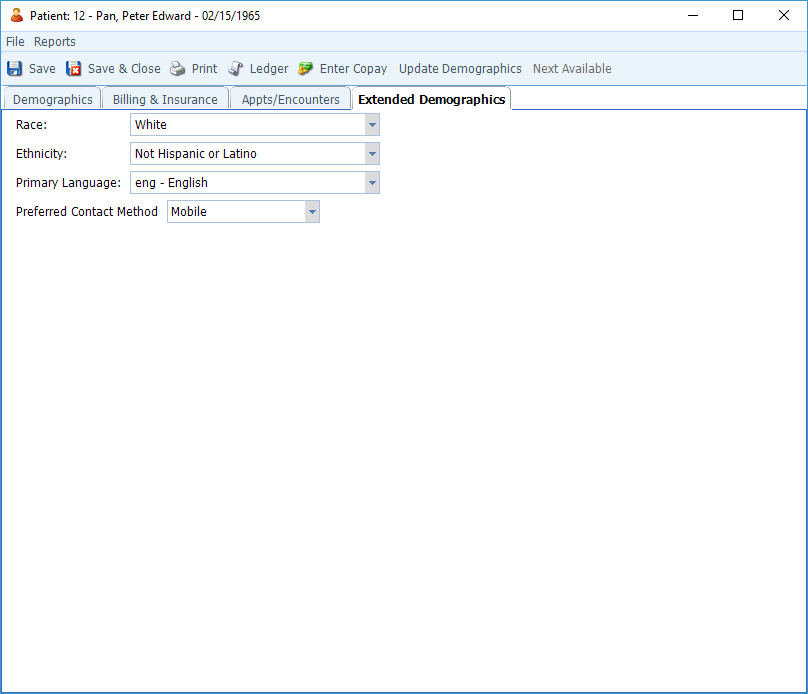
G. Enter Extended Demographics data
The information on the Extended Demographics tab is required only if you are interfacing MBSWin with an EMR system.
Connect
1220 E 7800 S, Floor 3
Sandy, UT 84094
Toll-Free (888) 337-4441
